
PowerShell is built directly on top of C#, written in C#, and has access to almost everything that .NET can give you. As a result, a lot of PowerShell syntax has very similar C# analogues, and much of C# can be translated into usable PowerShell code without much hassle.
Of course, you can also work with Add-Type to simply execute arbitrary C# code for you to work
with from PS if you want, but for our purposes we'll be doing direct translating so that you can see
how the two languages relate to one another, and how similar tokens look a little different in each
language.
Let's Get Translating
Our goal for today is to convert raw text into a image format. Why? Because we just want to see if we can! This is normally pretty tricky with PowerShell; it's not at all designed to work with image data whatsoever.
Luckily for us, the fantastic folks working with .NET Framework and Core have got us covered here!
Finding Code to Work With
This code came from a StackOverflow answer asking about a similar goal; creating an image from text input. We can do a very near-direct translation of this method to a PowerShell function.
private Image DrawText(String text, Font font, Color textColor, Color backColor)
{
    //first, create a dummy bitmap just to get a graphics object
    Image img = new Bitmap(1, 1);
    Graphics drawing = Graphics.FromImage(img);

    //measure the string to see how big the image needs to be
    SizeF textSize = drawing.MeasureString(text, font);

    //free up the dummy image and old graphics object
    img.Dispose();
    drawing.Dispose();

    //create a new image of the right size
    img = new Bitmap((int) textSize.Width, (int)textSize.Height);

    drawing = Graphics.FromImage(img);

    //paint the background
    drawing.Clear(backColor);

    //create a brush for the text
    Brush textBrush = new SolidBrush(textColor);

    drawing.DrawString(text, font, textBrush, 0, 0);

    drawing.Save();

    textBrush.Dispose();
    drawing.Dispose();

    return img;
}
The Method Signature
private Image DrawText(String text, Font font, Color textColor, Color backColor)
In C#, this is known as a method signature. You can think of it a bit like a param() block in
PowerShell. In fact, this could be used almost directly in PowerShell as a simple function, but I
think it's more worthwhile to convert this to a param() block so that we can work with the
PowerShell pipeline.
Let's Break it Down
private: This is an access modifier, preventing anything outside the class from accessing the following property or method. Remove these, as they are not valid in PowerShell.Image,String,Font,Color: These are type declarations, which are directly analogous to[string]and so forth in PowerShell, and we can translate them as such.- These type names are not fully qualified, and don't mention the namespace they belong to. Sometimes you'll have to Google for these, but these are kept in
System.Drawing. We can keep the short names in PS 5 and up by declaringusing namespace System.Drawing. In this case,System.Drawingisn't an assembly that's loaded by default, so we also need to callAdd-Type -AssemblyName System.Drawing.
- These type names are not fully qualified, and don't mention the namespace they belong to. Sometimes you'll have to Google for these, but these are kept in
DrawText( ... ): This is the method name and parameters.String text,Font font, etc.: These are the method parameter names and their types, as mentioned above. These will be replaced with PowerShell variables and type declarations.
Converting this is relatively straightforward. Let's do it step by step.
Step 1: Simple Function
Here, we'll just get as-close-as-possible PowerShell code by first converting each of the aforementioned pieces of the method signature, then doing a quick skim through the function. I'll leave the C# lines in as comments so you can see the direct comparison and conversion.
# private Image DrawText(String text, Font font, Color textColor, Color backColor)
function DrawText([string] $Text, [Font] $Font, [Color] $TextColor, [Color] $BackColor) {
    <# NOTE: C# uses the same syntax for static and non-static properties and methods;
       Some things will need you to look up the method to determine its nature. #>

    # Image img = new Bitmap(1, 1);
    [Image] $Img = [Bitmap]::new(1, 1)

    # Graphics drawing = Graphics.FromImage(img);
    [Graphics] $Drawing = [Graphics]::FromImage($Img)
    <#
        Remember:
            new Obj()      => [Obj]::new()
            Class.Static() => [Class]::Static()

        C# often carries the convention that static methods and class names are PascalCase, while
        variables are lowercase or camelCase. This can help in determining which is which.
    #>

    # SizeF textSize = drawing.MeasureString(text, font);
    [SizeF] $TextSize = $Drawing.MeasureString($Text, $Font)
    <#
        Remember:
            var.Method()   => $var.Method()
    #>

    # img.Dispose();
    $Img.Dispose()

    # drawing.Dispose();
    $Drawing.Dispose()

    # img = new Bitmap((int) textSize.Width, (int)textSize.Height);
    $Img = [Bitmap]::new([int] $TextSize.Width, [int]$TextSize.Height)
    <#
        Remember:
            (castType) value => [castType] $value
    #>

    # drawing = Graphics.FromImage(img);
    $Drawing = [Graphics]::FromImage($img)

    # drawing.Clear(backColor);
    $Drawing.Clear($BackColor)

    # Brush textBrush = new SolidBrush(textColor);
    [Brush] $TextBrush = [SolidBrush]::new($TextColor)

    # drawing.DrawString(text, font, textBrush, 0, 0);
    $Drawing.DrawString($Text, $Font, $TextBrush, 0, 0)

    # drawing.Save();
    $Drawing.Save()

    # textBrush.Dispose();
    $TextBrush.Dispose()

    # drawing.Dispose();
    $Drawing.Dispose()

    # return img;
    $Img # 'return' is usually not needed in PS at all, we can just drop it to function output!
}
Step 1A: Condense
And now that we're all done there, let's see a condensed and slightly refactored version without the comments:
function DrawText([string] $Text, [Font] $Font, [Color] $TextColor, [Color] $BackgroundColor) {
    [Image] $Img = [Bitmap]::new(1, 1)
    [Graphics] $Drawing = [Graphics]::FromImage($Img)
    [SizeF] $TextSize = $drawing.MeasureString($Text, $Font)

    $Img.Dispose()
    $Drawing.Dispose()

    $Img = [Bitmap]::new([int] $TextSize.Width, [int]$TextSize.Height)
    $Drawing = [Graphics]::FromImage($img)
    [Brush] $TextBrush = [SolidBrush]::new($TextColor)

    $Drawing.Clear($BackgroundColor)
    $Drawing.DrawString($Text, $Font, $TextBrush, 0, 0)
    $Drawing.Save()

    $TextBrush.Dispose()
    $Drawing.Dispose()

    $Img
}
Step 2: PowerShell Nuances
Now that we've got the code converted into valid PowerShell code syntax, we'll probably start
having to look at potential issues. One of the most common is that in C#, the
using System.Namespace.TypeName declarations at the head of a file are often omitted in example
snippets.
Frequently we'll have to do some Googling to figure out exactly where these things are in
the .NET code, but for this example I can tell you that all of these things are in System.Drawing.
This isn't an assembly that gets loaded by default, so we'll also need to tell PowerShell to load
it for us.
To do so, we simply include using namespace System.Drawing at the head of our file, to allow
us to use the short names, and Add-Type -AssemblyName System.Drawing before we use any of them, to
actually load the assembly. We'll put them both at the top of the file for clarity.
For future reference, if you aren't sure a particular assembly is loaded, the best thing to do is
to examine the documentation for the class, namespace, or method you're working with.
System.Drawing.Bitmap is documented
here,
and you can see that it uses a separate assembly by looking at the top of the page:
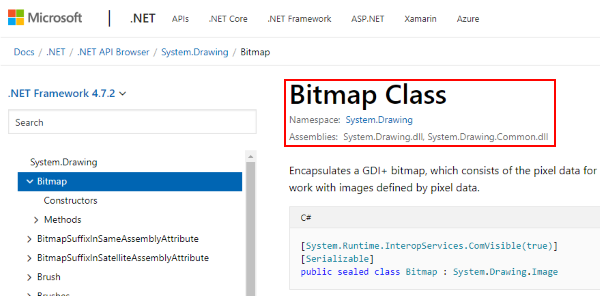
Note that the Assemblies are listed as distinct files; this indicates we will have to load them
specifically. A majority of .NET classes are simply loaded by default and we need not bother with
this, but in some cases we will need to be aware of it.
With this knowledge, we add these lines to the top of our script:
# Permit use of short type names ([Image] instead of [System.Drawing.Image], etc.)
using namespace System.Drawing

# Load System.Drawing assembly
Add-Type -AssemblyName System.Drawing
Step 3A: Best Practices — Parameters
Next, we turn to PowerShell best practices and look at our potential inputs and outputs. Personally, when writing this function, I would prefer not to have to specify a font style or any colors myself.
To make this happen, we need to declare a proper param block with proper default values. We'll opt
to simply define the font and colors ourselves in our function, although you could opt to permit any
arbitrary [Font] or [Color] objects as input for appropriate parameters!
We'll also add support for exporting to clipboard and saving out to a file; this will mean implementing some parameter sets, as well!
param(
    [Parameter(Position = 0, Mandatory, ValueFromPipeline)]
    [string[]]
    $Text,

    [Parameter(Mandatory, ParameterSetName = 'Clipboard')]
    [switch]
    $ToClipboard,

    [Parameter(Position = 1, Mandatory, ParameterSetName = 'File')]
    [Alias('FilePath', 'ToPath', 'ToFile')]
    [string]
    $Path
)
The constructors and available values can generally always be retrieved from an online documentation
page, but you can also check through the available members with [Type].GetMembers().Name for
classes, [EnumType].GetEnumValues() for enums, and for constructors you can query
[TypeName]::new (without the parentheses usually used for method calls) to get a list of the
available OverloadDefinitions.
We'll also need to determine the best way to have this function fit into general PowerShell use. That often means implementing some degree of pipeline support. In this case, I've opted to allow pipeline or array input for the input string, allowing you to (for example) get the contents of a file and pipe it on in to make an image out of that text.
Step 3B: Best Practices — Function Body
We'll need some more code to make that happen, so let's take another look at our function and
rewrite it to make it work as we want. It needs a new name, too… Export-Png sounds lovely!
The .Dispose() calls here are largely unnecessary; we're not working with external resources,
so we're probably safe to snip those out and let the PowerShell and .NET garbage collector
routines clear those up for us.
function Export-Png {
    [CmdletBinding()]
    param(
        [Parameter(Position = 0, Mandatory, ValueFromPipeline)]
        [Alias('InputObject', 'Text')]
        [string[]]
        $InputString,

        [Parameter(Mandatory, ParameterSetName = 'Clipboard')]
        [switch]
        $ToClipboard,

        [Parameter(Position = 1, Mandatory, ParameterSetName = 'File')]
        [Alias('FilePath', 'ToPath', 'ToFile')]
        [string]
        $Path
    )
    begin {
        $StringBuilder = [System.Text.StringBuilder]::new()

        $ImageFont = [Font]::new(
            "Consolas",
            12,
            [FontStyle]::Regular,
            [GraphicsUnit]::Point
        )
        $ForegroundColor = [Color]::LightGray
        $BackgroundColor = [Color]::Black
    }
    process {
        foreach ($Line in $InputString) {
            $StringBuilder.AppendLine($Line) > $null
        }
    }
    end {
        [Image] $Image = [Bitmap]::new(1, 1)
        [Graphics] $Drawing = [Graphics]::FromImage($Image)

        $ImageText = $StringBuilder.ToString()
        [SizeF] $TextSize = $Drawing.MeasureString($ImageText, $ImageFont)

        $Image = [Bitmap]::new([int] $TextSize.Width, [int]$TextSize.Height)
        $Drawing = [Graphics]::FromImage($Image)
        [Brush] $TextBrush = [SolidBrush]::new($ForegroundColor)

        $Drawing.Clear($BackgroundColor)
        $Drawing.DrawString($ImageText, $ImageFont, $TextBrush, 0, 0)
        $Drawing.Flush()

        switch ($PSCmdlet.ParameterSetName) {
            "SaveFile" {
                try {
                    $Image.Save($Path, [Imaging.ImageFormat]::Png)
                }
                catch {
                    $PSCmdlet.WriteError($_)
                }
            }
            "Clipboard" {
                [System.Windows.Forms.Clipboard]::SetImage($Image)
            }
        }
    }
}
The Finished Product
With some additional bits and pieces, we make our way to a fully fleshed-out PowerShell function!
I've dropped a few unneeded calls here and there, and I've also opted to use some additional brush smoothing options for a cleaner, less pixelated-looking font output.
Finally, I've chosen to add back in the ability to select colors for the output image, though I
needed an enum for this to work out, and thankfully the colors are available from
System.Drawing.KnownColor — using an enum here makes selecting a custom color much simpler
from the function call, as it can simply be specified by name as a string.
One final disclaimer: while System.Drawing is available for .NET Core, System.Windows.Forms is
not. As a result, if you plan to use this with PowerShell Core, you'll need to snip out the parts
that deal with exporting to the clipboard.
using namespace System.Drawing
using namespace System.Windows.Forms
using namespace System.Text

Add-Type -AssemblyName System.Windows.Forms

# PowerShell Core uses System.Drawing.Common assembly instead of System.Drawing
if ($PSEdition -eq 'Core') {
    Add-Type -AssemblyName 'System.Drawing.Common'
}
else {
    Add-Type -AssemblyName 'System.Drawing'
}

function Export-Png {
    <#
        .SYNOPSIS
        Exports one or more lines to an image file, or to the clipboard as an image.

        .DESCRIPTION
        Takes one or more lines of text as input, and creates a new image file using
        the System.Drawing assembly. This file will be saved as a .PNG file to the
        specified path, or copied as an image to the clipboard if desired.

        The text will be in a light grey colour with a dark background, matching the
        default display of the PowerShell Core console.

        .EXAMPLE
        "Hello world" | Export-Png -ToClipboard

        This will create a small image with the text "Hello world" written on it,
        which will be stored in the clipboard, available for pasting to another
        application.

        .NOTES
        At this time, color and font selections are not permitted. This could
        easily be implemented by exposing these as parameters, but should
        probably retain their current values as defaults, for convenience.
    #>
    [CmdletBinding(DefaultParameterSetName = 'SaveFile')]
    [Alias('epng', 'draw')]
    param(
        # The text input to write onto the image.
        [Parameter(Position = 0, Mandatory, ValueFromPipeline)]
        [Alias('InputObject', 'String', 'Text')]
        [ValidateNotNullOrEmpty()]
        [string[]]
        $InputString,

        # The file path(s) to save the image file to.
        [Parameter(Position = 1, Mandatory, ParameterSetName = "SaveFile")]
        [Alias('DestinationFile', 'OutFile', 'File', 'PSPath')]
        [ValidateScript(
            {
                Test-Path -Path $_ -IsValid -PathType Leaf
            }
        )]
        [string[]]
        $Path,

        # Copy the image to clipboard instead of saving to file. This image can
        # be pasted into a program such as MS Paint or other image-aware
        # application.
        [Parameter(Mandatory, ParameterSetName = "Clipboard")]
        [switch]
        $ToClipboard,

        # The color of the text in the image.
        [Parameter()]
        [Alias('Color','FontColor')]
        [KnownColor]
        $ForegroundColor = [KnownColor]::LightGray,

        # The color of the background in the image.
        [Parameter()]
        [KnownColor]
        $BackgroundColor = [KnownColor]::Black
    )
    begin {
        [Bitmap] $Image = [Bitmap]::new(1, 1)
        $StringBuilder = [StringBuilder]::new()

        # Create the Font object for the image text drawing.
        $ImageFont = [Font]::new(
            "Consolas",
            12,
            [FontStyle]::Regular,
            [GraphicsUnit]::Point
        )

        # Create a graphics object to measure the text's width and height.
        $Graphics = [Graphics]::FromImage($Image)
        $Foreground = [Color]::FromKnownColor($ForegroundColor)
        $Background = [Color]::FromKnownColor($BackgroundColor)

        if ($PSCmdlet.ParameterSetName -eq 'SaveFile'){
            if ($Path -notmatch '\.png$') {
                # We always output as .png, so ensure we have correct extension
                $Path += '.png'
            }

            # Convert possible partial or wildcard paths into their full paths for the .NET methods
            if (-not (Test-Path -Path $Path)) {
                $Path = (New-Item -Path $Path).FullName
            }
            else {
                $Path = (Get-Item -Path $Path).FullName
            }
        }
    }
    process {
        foreach ($Line in $InputString) {
            $StringBuilder.AppendLine($Line) > $null
        }
    }
    end {
        $ImageText = $StringBuilder.ToString()

        # This is where the bitmap size is determined.
        $Width = [int] $Graphics.MeasureString($ImageText, $ImageFont).Width
        $Height = [int] $Graphics.MeasureString($ImageText, $ImageFont).Height

        # Create the bmpImage again with the correct size for the text and font.
        $Image = [Bitmap]::new($Image, [Size]::new($Width, $Height))

        # Add the colors to the new bitmap.
        $Graphics = [Graphics]::FromImage($Image)

        # Set Background color
        $Graphics.Clear($Background)
        $Graphics.SmoothingMode = [Drawing2D.SmoothingMode]::AntiAlias
        $Graphics.TextRenderingHint = [Text.TextRenderingHint]::AntiAlias

        $Graphics.DrawString($ImageText, $ImageFont, [SolidBrush]::new($Foreground), 0, 0)
        $Graphics.Flush()

        switch ($PSCmdlet.ParameterSetName) {
            "SaveFile" {
                try {
                    foreach ($FilePath in $Path) {
                        $Image.Save($FilePath, [Imaging.ImageFormat]::Png)
                    }
                }
                catch {
                    $PSCmdlet.WriteError($_)
                }
            }
            "Clipboard" {
                [Clipboard]::SetImage($Image)
            }
        }
    }
}
As you can see, converting is relatively straightforward. Some knowledge of the nuances can be key, but C# is largely directly convertible to PowerShell. The real challenge begins when you want to properly make it fit into the PowerShell methodologies.
PowerShell does a lot of things that C# doesn't typically do, so we have to add some additional bits and pieces along the way to really make a complete PowerShell function.
Thanks for reading!